If you’re a business owner, freelancer, or organization looking for a fast and easy way to collect payments online without needing a website or coding, then the Payment Link by CHIP is exactly what you need. With a few simple steps, you can create a no-code, shareable link or QR code that allows customers to pay instantly through FPX, DuitNow QR Online, credit/debit cards, or e-wallets. In this guide, we’ll walk you through how to create a payment link using CHIP, from signing up your merchant account to tracking payments effectively.
What Is Payment Link?
A payment link is a secure, shareable link that lets you collect payments directly from your customers from anywhere and anytime.
Customers can click the link or scan a QR code to pay for products or services using various payment methods like online banking (FPX), DuitNow QR Online, credit/debit cards, or e-wallets.
It’s ideal for businesses selling through social media, WhatsApp, email, or in-person events with no e-commerce platform required.
Why Use CHIP’s Payment Link?
CHIP offers one of the most user-friendly and reliable payment link systems in Malaysia.
Here’s why thousands of businesses choose CHIP:
- No coding or website required
- Secure and compliant payment infrastructure
- Accepts FPX, DuitNow QR Online, cards, and e-wallets
- Customizable branding and checkout experience
- Real-time transaction tracking
Whether you’re selling online, collecting donations, or managing event registrations, CHIP’s Payment Link makes payment collection quick and effortless.
Step 1: Prerequisites and Setup Before Creating a Payment Link
Before you can start creating payment links, you’ll need to complete a few essential setup steps on the CHIP merchant portal.
1. Sign Up and Get Your Account Approved
Start by visiting www.chip-in.asia and signing up for a merchant account.
Here’s what you need to do:
- Fill in your business information.
- Verify your email address (check your inbox or spam folder).
- Submit your business documents such as:
- SSM registration
- Bank account details
- Business owner identification
Once submitted, the CHIP team will review your documents. Account approval typically takes 1 business day.
Tip: Make sure all your submitted documents match your registered business name to avoid delays.
2. Setup Brands and Products
Once your account is approved, log in to the CHIP Merchant Portal.
Add Products
Next, create at least one product to associate with your payment link.
For each product, fill in:
- Product Name
- Description
- Price
- Product Image (PNG, JPG, JPEG, or WebP format)
Tip: Use high-quality images (at least 1000px wide) to make your payment page look more professional.
Once your brand and products are ready, you can proceed to create your first payment link.
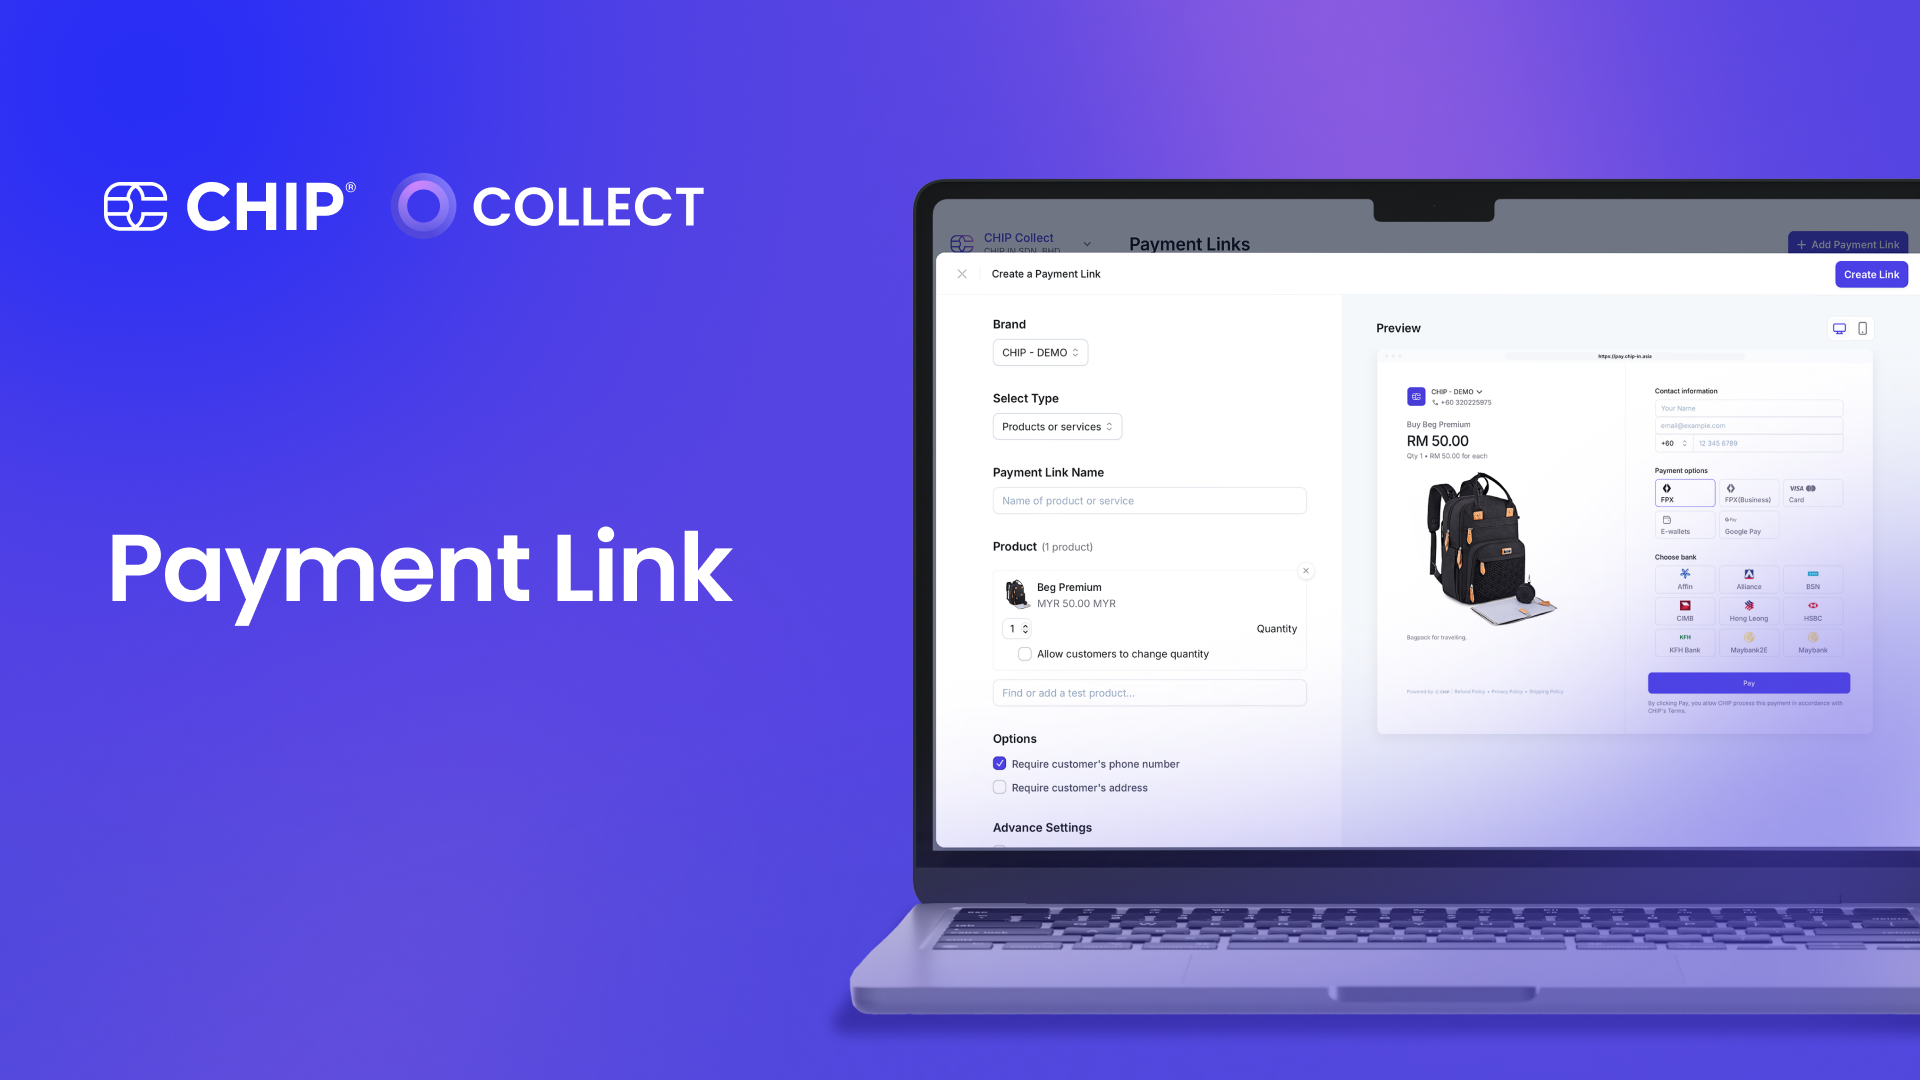
Step 2: Creating a Payment Link in CHIP
Now that your setup is done, you can create your first payment link in just a few minutes.
1. Log in to the CHIP Merchant Portal
Go to www.chip-in.asia and log in with your approved merchant credentials.
2. Navigate to the Payment Links Section
Once you’re inside the dashboard:
- Click “Links” in the top-left menu.
- Then select “New Link” or “Add Payment Link.”
This will open the Payment Link creation form.
3. Add Title and Description
Enter a Title that clearly identifies what the payment is for (e.g., “Product Purchase,” “Workshop Registration,” “Donation Drive”).
In the Description field, briefly explain the purpose or details of the payment. This helps customers understand what they’re paying for.
4. Upload a Poster Image
You can upload a poster image that will appear on your payment page.
Recommended specifications:
- Size: 2000px x 2000px
- Format: JPG, PNG, or GIF
- Maximum size: 3MB
This image can be your brand logo, a promotional banner, or product photo.
5. Select Your Brand
If you have multiple brands in your account, choose the correct Brand Name from the dropdown list.
This ensures the payment page matches the brand the customer expects to pay.
6. Request Customer Details
Under “Request Client Details,” you can enable fields for information you want customers to fill in before payment — such as:
- Full Name
- Contact Number
- Delivery Address
You can make certain fields mandatory depending on your business needs.
Example: For event bookings, you might require Full Name and Email. For deliveries, you may add Address and Phone Number.
7. Select Products
Now, choose the product(s) you created earlier.
You can:
- Allow customers to select product quantities, or
- Fix it to a specific product (ideal for donations or service fees)
You can even create a custom field for flexible pricing if needed.
8. Configure Custom Fields and Advanced Settings
CHIP gives you flexibility to customize your payment link further.
Custom Fields
You can enable text, number, or dropdown fields for collecting extra data — such as coupon codes, membership IDs, or special requests.
Advanced Settings
You can also set a custom redirect URL — a web page that customers will be directed to after completing payment.
For example:
- A thank-you page
- A booking confirmation page
- A membership welcome page
9. Choose Button Text
You can personalize the call-to-action (CTA) button text.
Choose from:
- “Pay” (for general payments)
- “Book” (for reservations or events)
- “Donate” (for NGOs and charities)
This small detail helps tailor the experience to your audience.
10. Create and Save Your Link
Once everything is ready, click “Create Link” or “Save.”
Congratulations — you’ve just created your first CHIP Payment Link!
Step 3: Sharing Your Payment Link
After your link is created, you can start sharing it instantly.
1. Copy the Link
Copy the auto-generated URL from your CHIP portal.
2. Share Anywhere
You can send or post it on:
- WhatsApp or Telegram messages
- Invoices
- Instagram or Facebook pages
- Email newsletters
- Digital flyers
- QR posters or receipts
Tip: The more visible your link, the higher your chances of converting potential customers into paying customers.
3. Convert to a QR Code
Want to make it even more convenient?
Convert your payment link into a QR code so customers can simply scan and pay. It’s perfect for physical events, pop-up stores, or donation drives.
Step 4: Tracking and Managing Transactions
Once customers start using your payment links, you can easily track performance within your merchant portal.
1. Track Transactions
Go to the Feed tab in your dashboard to see all payments collected via your links.
You can:
- Filter transactions by date or product
- View customer details
- Check payment status in real time
You can also download payment reports or statements with transaction details for record-keeping.
2. Manage Your Payment Links
CHIP gives you full control over your links:
- Pause or deactivate a link temporarily
- Edit link details anytime (e.g., price or description)
- Reactivate previously paused links
You can even analyse click-through and conversion rates to see how each link is performing with a valuable insight for improving your sales strategy.
Step 5: Best Practices for Using Payment Links
To make the most out of CHIP’s Payment Link feature, follow these simple tips:
- Use clear titles and images. Customers are more likely to complete a payment when the product and purpose are clear.
- Enable essential client details. Collect customer emails or phone numbers for easy follow-up.
- Add redirect pages. Guide users to thank-you or confirmation pages to enhance professionalism.
- Promote across multiple channels. Share your payment link on social media, WhatsApp, and printed QR codes for maximum reach.
- Track analytics regularly. Use the dashboard insights to understand customer behaviour and improve performance.
Summary: Fast, Secure, and Code-Free Payment
Creating a payment link with CHIP takes only a few minutes — but it can completely transform how your business collects payments.
Here’s a quick recap:
- Sign up and verify your CHIP merchant account
- Set up your brand and products
- Create a payment link with custom fields
- Share it via link or convert to QR
- Track transactions in real time
No coding, no website — just a smart, no-hassle payment solution for modern businesses.
Whether you’re collecting donations, selling through social media, or accepting bookings, CHIP’s Payment Link lets you do it all with simplicity and style.
Start Creating Your Payment Link Today
Ready to get started?
Head over to CHIP and create your first Payment Link today.
With CHIP, you can:
- Accept FPX, DuitNow QR Online, card, and e-wallet payments instantly
- Share links or QR codes anywhere
- Track transactions in real time
Start collecting payments the easy way — with CHIP’s Payment Link, the smarter, faster, and simpler solution for businesses in Malaysia.